

Installation de certificats sur Microsift IIS 7
How to install your SSL Certificate to your Windows 2008 Server
After DigiCert issues your SSL certificate, you will first need to install it to the server from which the certificate request was generated.
1. Save the Bundle Certificate (CertificateBundle.p7b) from your DigiCert Customer Account to the desktop of the web server you are securing.
2. Click on Start, then Administrative Tools, then Internet Information Services (IIS) Manager.
3. Click on the server name.
4. From the center menu, double-click the "Server Certificates" button in the "Security" section (near the bottom of the menu).

5. From the "Actions" menu (on the right), click on "Complete Certificate Request." This will open the Complete Certificate Request wizard.
Note: If you are unable to complete the certificate request, or if no pending request is found, and you are sure the CSR was created on this server, you will need to reissue your certificate by creating a new CSR (see our CSR creation instructions for IIS 7). After creating a new CSR, login to your DigiCert account and click the reissue button for your certificate.

6 . Browse to the CertificateBundle.p7b file that was provided to you by DigiCert. You will then be required to enter a friendly name. The friendly name is not part of the certificate itself, but is used by the server administrator to easily distinguish the certificate

7. Clicking "OK" will install the certificate to the server.
8. Once the SSL certificate has been successfully installed to the server, you will need to assign that certificate to the appropriate website using IIS.
9. From the "Connections" menu in the main Internet Information Services (IIS) Manager window, select the name of the server to which the certificate was installed.
10. Under "Sites," select the site to be secured with SSL.
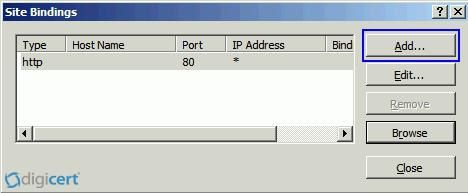
11. From the "Actions" menu (on the right), click on "Bindings." This will open the "Site Bindings" window.

12. In the "Site Bindings" window, click "Add..." This will open the "Add Site Binding" window.
13. Under "Type" choose https. The IP address should be the IP address of the site or All Unassigned, and the port over which traffic will be secured by SSL is usually 443. The "SSL Certificate" field should specify the certificate that was installed in step 7.
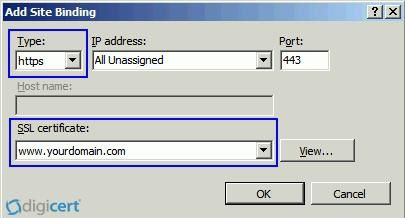
14. Click "OK."

15. Your SSL certificate is now installed, and the website configured to accept secure connections.
16. If your web site is publicly accessible, our SSL Certificate Tester tool can help you diagnose common problems.
17. Open a web browser and visit your site using https. It is best to test with both Internet Explorer as well as Firefox, because Firefox will give you a warning if your intermediate certificate is not installed. You should not receive any browser warnings or errors. If you immediately receive a browser message about the site not being available, then IIS 7 may not yet be listening on port 443. If your web request takes a very long time, and then times out, a firewall blocking traffic on TCP port 443 to the web server.